This page carefully describes the process of getting Ubuntu 12.10 Quantal Quetzal working on an early 2011 MacBook Pro (8,1).
You can check if the model you have is the right one by executing in a terminal:
sudo dmidecode -s system-product-name
First steps
To install GNU/Linux on your MacBook Pro, you have to download the latest Ubuntu 12.10 iso image and burn it on a 800MB CD or a DVD. Get it from here. If you are looking for help, refer to the dedicated page on Ubuntu website.
At this point, you have to shrink your main OS X partition(s) (with Disk utility, for example) to make room on your Hard Disk and install rEFIt with its Installer Package. rEFIt is a user friendly interface to the Mac EFI that will cause a boot menu (to select between OSX and Ubuntu) to appear on every boot.
Once you completed the previous steps, start your live media by rebooting your OSX operating system and holding the “C” key on your keyboard as soon as you hear the booting sound. You should get a menu to select the type of boot you would like: choose to start the live environment of Ubuntu.
Install from Live CD/DVD
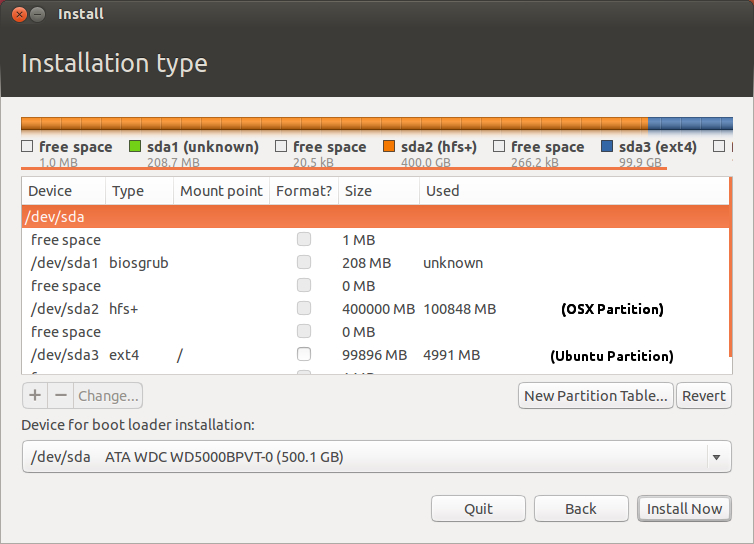
Once Ubuntu completes the boot process, start Ubiquity (the installer) double-clicking the Install Ubuntu shortcut on the desktop. Complete all the steps proposed, partitioning your Hard Disk like the screenshot below: one 100/200MB partition at the beginning of the disk reserved for biosgrub, leave your OSX HFS+ partition untouched and one ext4 partition for Ubuntu mounted as “/” (root). Create an additional swap partition if needed, 4GB should be fine. Install GRUB bootloader to the MBR of your hard disk (usually /dev/sda).

When the install process finishes, reboot your computer.
Out of the box working features
Ethernet LAN, Webcam, Microphone, Sensors, Screen, Video, Card reader, Keyboard and Hibernate work out of the box, no further configuration is needed.
Wireless
There is no official support yet for WiFi pci network card Broadcom 4331 in Ubuntu 12.10, but you can get it working with the following repository:
sudo add-apt-repository ppa:mpodroid/mactelsudo apt-get updatesudo apt-get install b43-fwcutter firmware-b43-installer
Then install the modules package for your kernel with the following command:
sudo apt-get install linux-backports-modules-cw-3.6-`uname -r`
For example, at the very moment I am writing this the command should be “linux-backports-modules-cw-3.6-3.5.0-18-generic”. Edit the /etc/modprobe.d/blacklist.conf and add the line:
blacklist ndiswrapper
Create or edit the file /etc/pm/config.d/modules and make sure the wireless modules (b43 and bcma) are blacklisted:
SUSPEND_MODULES="b43 bcma"
Reboot and the wireless should work.
Bluetooth
Bluetooth occasionally does not work; to fix it, create the file /etc/modprobe.d/options and write in it a single line containing
options b43 btcoex=0
This disables the “protection” mode in the b43 wireless card driver, enabling it to coexist with the bluetooth functionality. Then, reboot.
Note: merely modprobing the driver in and out will not do it, neither modprobing with the btcoex=0 as option. Also, switching Bluetooth on and off from Blueman applet is an hassle. To get it working again you have to reboot.
Suspend
To suspend to RAM your MacBook, install uswsusp with
sudo apt-get install uswsusp
Then, select a swap partition and add to file /etc/pm/config.d/module the following content:
SLEEP_MODULE=uswsusp
Sound
Sound almost works, but some tweaking is needed to enable both speakers. Unmute Front Speaker and Surround Speaker with
alsamixer
Touchpad and Natural Scrolling (OSX Style)
Touchpad works fine out-of-the-box. You can disable the mouse-click with the trackpad tap and enable the vertical scrolling with two fingers in Preferences. To get scrolling working like you were used to in OSX (the so-called Natural Scrolling), you have to change the new “smooth scrolling” implementation Ubuntu uses since GTK 3.4. Execute:
xinput list-props 11 | grep "Scrolling Distance"
Something like the following output will appear:
Synaptics Scrolling Distance (275): 232, 232 Synaptics Circular Scrolling Distance (288): 0.100000
You should get one or two lines as a reply. Make a note of the number in parentheses next to “Synaptics Scrolling Distance” – mine was 275 – and the following values – mine were both 232. Next up, go to the “Preferences” menu, click “Startup Applications“, click the “Add” button, give the entry a name (say, for example, “Natural Scrolling”) and add the following command, replacing the properties in bold with the numbers you found in the previous step:
xinput set-prop 11 275 -232 -232
Reboot and enjoy.
